In this article, we will be looking at the tools needed for fitting door handles, as well as the process for installing your handles correctly.
If you are simply replacing handles, then the process is extremely easy. You will simply need a screwdriver to remove the old handles and replace with new ones.
However, if you are installing the handles from scratch, you will need more tools. This will require you to cut a mortice for the latch, drill holes for the handle spindle, and also tools to cut out the keep (latch plate) in your door casing.
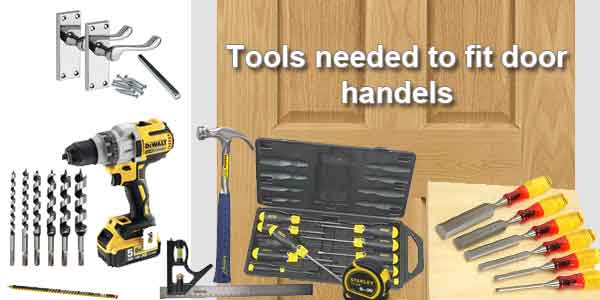
The tools needed to fully install handles to a door can be seen below:
- Sharp pencil.
- Tape measure.
- Set square
- Hammer
- Cordless drill.
- Wood drill bits – I like to use auger bits.
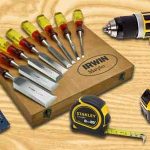
- Set of chisels
- Set of screwdrivers
Door handle fitting instructions
Marking your door out
If you have recently hung a new door and need to fit new handles, the process is relatively simple. The first job, is to mark out the height of your handles, as well as the area that needs cutting out to accommodate the mortice latch.
To do this, you will need to measure the height of the door handle. On most doors, this will be around one meter from the bottom of the door. Simply create a light mark on the door surface at this height. This mark should be roughly where you expect the handle to be placed, back from the door edge.
Next, take your set square and transfer this line all the way around the edge of the door and onto the other side. At this point, you should have a faint pencil line going from one side of the door, around the edge, and to the other side of the door.
Next, take your mortice latch and offer it up to the line on the face of the door. The face plate should be flush with the edge of the door, and you should be able to see your pencil line through the spindle hole in the mortice latch. Take your pencil and draw a small vertical line through the existing pencil line.
Repeat this on the other side of your door, and now you have the exact point where your handle spindle will pass through the door.
Next, you need to mark where you will drill the mortice hole. You already have your one-meter line transferring all the way around the edge of the door. This means, you simply need a vertical line in the exact centre of the door edge. This will create a cross, for the centre of your mortice hole.
Tools for marking out your handles and mortice hole
For this entire marking out process, all you will need is a sharp pencil, a standard tape measure and a square. You can see the type of set square I use by clicking here
Cutting out your mortice latch and spindle holes
Once you have completed your marking, you are ready to cut out and install your handles.
The first thing to do, is cut out your mortice hole. To do this, you should choose an auger bit closest in size to the barrel of the mortice latch. You can mark a top and bottom line and two lines either side to act as a guide
Place the point of your drill bit, on the centre of your cross mark on the edge of the door.
Now, you should drill as straight as possible to the correct depth. This can be highlighted by placing some tape around the drill bit to the desired depth.
Once fully drilled out, it is likely that your latch will not be a perfect fit. At this point, you can take a sharp chisel and cut the hole out square to accommodate the latch.
You will know when this is done correctly, because your mortice latch should slide all the way into the door, without any resistance.
Now that the mortice hole is cut, you can drill holes through the marks you created earlier for your handles.
This should be drilled from both sides. Don’t drill all the way through the door!
Take an appropriately sized bit, that is slightly bigger than the spindle. Drill through one side of the door, until it cuts through into your mortice hole. Then repeat this on the other side of your door.
Now you should be able to put your mortice latch in the door and see the spindle holes, through the holes you just cut. These will be slightly offset until you chop the face plate in.
Tools used to cut out mortice latch and spindle holes
In order to complete this step you will need the following tools:
- A cordless drill – You can see the drill I personally use by clicking here.
- Auger Bits – You could also opt for flat/spade bits. However, auger bits are my personal preference – You can see a good set of auger bits by clicking here.
- Set of chisels – At this point, it is likely you will need a couple of different chisel sizes, in order to cut the mortice vertically and horizontally. Good chisels will usually have a lifetime guarantee. Therefore it makes sense to buy decent chisels. You can see the ones I recommend by clicking here
- Hammer – Any hammer will do the job, However, as a professional carpenter I am a big fan of Estwing hammers. You can see a good example by clicking here
Cutting the faceplate and fixing the handles
This is relatively simple, and you will be using your chisels again. Simply push your mortice latch into the hole, so the faceplate is sitting tight to the edge of the door. Ensure it is straight and in line with the edge of the door (not wonky)
When you are happy with the position, take a sharp pencil and draw a thin clear line around the edge of the faceplate.
Once this is marked, remove the latch from the door and proceed to cut around the line with a chisel. This should be done with a hammer, and you should aim to keep tight inside the pencil line.
Once This is done, you can use the chisel, to cut out to the depth of the faceplate inside the lines. If done correctly, the faceplate should sit neatly inside the lines flush with the surface of the edge of the door.
At his point, your spindle holes should line up perfectly, ready to receive your handles.
Once you’re happy, your mortice latch can be screwed in place. Usually it is best to do this with a manual screwdriver. This will avoid any slips and potential scratches on the faceplate.
When this is done, the handles can also be put on. This is just a case of sliding the spindle through the hole and putting the handles on either side. These just need lining up to make sure they are straight, then they can be screwed in place.
The type of screwdrivers you use at this point, will depend on the type and size of screws provided.
If you are looking for a decent set, you can’t go far wrong with some Stanley screwdrivers, like these ones here.
Fitting keeps on the door casing
At this point your handles and latch should be fitted perfectly. The last thing you need is the keep (latch plate) fitting on the casing. This will allow the door to latch and close.
To mark this out, close the door into the casing and mark the top and bottom of the door latch on the casing. Next, measure the distance from the edge of the door to the flat edge of the latch, then transfer this measurement to the casing.
At this point, you should have the top bottom and front of the latch marked on the door casing.
Next take the keep and line the latch hole up with your markings. Once you are happy, you can draw around the keep with a sharp pencil and add a back line to the latch hole.
The process for chopping the keep out, is very similar to cutting out your faceplate. The only difference, is you need to cut a deeper hole in the middle to accommodate the latch.
To complete this job, you will likely use several different sized chisels, hence the reason you really need a full set, as suggested previously.
Once this is cut out neatly, it should also sit nice and flush with the casing. It will also need screwing in place, and again I would recommend doing this with a manual screwdriver.
If everything has been done correctly, your door should latch perfectly, and your handles should be in full working order.