Tongue and groove chipboard flooring is a popular sub floor material. This is mainly due to the fact, its easier and cheaper to install than traditional timber floorboards.
The most common size for chipboard flooring is 600mm x 2400mm and a thickness of between 18-22mm.
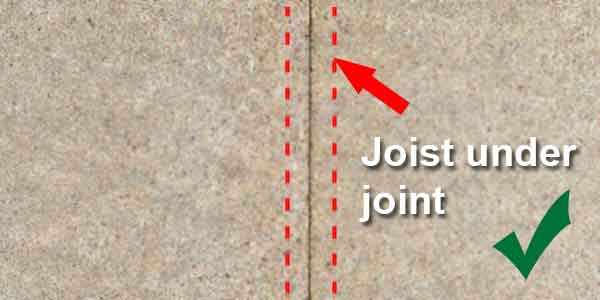
Chipboard flooring should be fitted perpendicular to floor joists, and the tongue and groove joint should land on a joist where two boards meet. The tongue and groove creates an interlocking joint that is strong and stable. However, on its own, it is not strong enough to support weight from above.
If the joint is floating between joists, it will potentially create an unsafe surface. This could result in the joint moving, coming loose, or even breaking over time.
Even where the joint doesn’t break, it is still not supported, so it will flex and sag as weight is applied to it. This could result in an uneven surface.
When the joint is fitted correctly on a joist, it will be fixed together with glue, as well as being screwed to the joist. This creates a completely solid and even transition between the boards. If this extra support and fixing is not provided, the joint will only have a bead of glue holding it together.
In most cases, the floor joists will be fitted at 400mm centres. Therefore, it is likely that you will hit a joist with a joint between boards.
For smaller floors where two boards span the entire area, you can often cut the boards at the wall to ensure the joint hits a joist. However, for larger floors you may need to add additional support.
Adding support when you don’t hit a joist
One of the good things about tongue and groove, is it creates a strong joint between the boards. This creates a level surface and avoids future movement (providing they are fitted correctly).
If the joint is not supported, it is likely to move or become weak and could even break. It is also not advised to cut the boards and butt the ends together.
Whilst butting cut ends would be better than a floating joint, it could still cause an uneven step between two boards. Even if this step is not present to start with, it could develop over time.
Therefore, you should aim to avoid either of these scenarios. If you do find a case where you are not hitting a joist, you will need to add additional support.
Support can be added by installing noggins that will bridge the gap below the joint. To do this you Should add a couple of noggins between the joist running perpendicular to the joint.
Place one noggin at the back of the board and one at the front. Between these noggins, add another piece of timber that will run directly under the joint.
Noggins alone would give pretty good support. However, an additional timber between these, would support the whole joint, including the corners.
In order to provide good support, you should ensure that you fix the timber noggins securely. This can be done with 4-inch nails or screws. Use at least two fixings in either end of a noggin to create a strong bridge for the joint.
How to fix your chipboard flooring
As we have already discussed, we want to ensure the joints are well supported. In most cases, you will be hitting a joist, but if you are not, adding additional support is relatively easy.
To fix the boards down, you can use nails or screws. However, screws are far superior and definitely recommended if this is your own floor.
Despite this, in new build properties, the floors will often be nailed by the carpenters, but this is usually because it is faster and cheaper, especially if they are using nail guns.
The problem with nails, is they can result in squeaky floorboards. Screws will give you a much tighter fixing as they bite into the wood and stop movement.
On the other hand, a nail is much smoother and can move up and down slightly. This can result in creaking floorboards.
Screwing will take longer, but it is definitely worth it, as it will give a stronger long-lasting result.
You should also ensure that you glue every single tongue and groove joint. This will reduce movement in the boards due to things like expansion and contraction.
For the same reason, you should aim to leave a 10mm gap around the external walls to allow for the same kind of movement. This expansion and contraction, is the result of changes in temperature and humidity throughout the year.
Finally you should aim to stagger joints on each row of boards. To do this start from alternate sides with each row. This way you avoid continuous joints across your floor. Again, this will maintain a stronger, more level surface.
Conclusion
Chipboard flooring does have to join on a joist. If it doesn’t, there is a large risk of movement and damage to your flooring.
Even if the joists don’t line up, it is usually relatively simple to add additional support. Because boards tend to be 2400mm, this extra support should only need installing occasionally, in order to pick up any floating joints