A garage is a useful space for any home. It can be used for a variety of purposes, such as:
- Storing vehicles
- Garden equipment
- tool storage
- general household storage
- etc.
It could even be converted into a more usable room. For example, a gym, or a home office. However, most garages do have a problem, and that is how they are built. This is usually a single skinned structure.
If the garage is just for the car, or maybe some tools and a lawnmower, this Is not much of an issue. But when it comes to storing more delicate items, or using the garage as an actual room, this can cause problems.
The main issue is cold and damp. Because the walls are single skin, they don’t tend to be very warm. They are also at a far greater risk of penetrating damp.
Due to the walls being a single skin, this can cause a problem. How do you make it warmer and less damp? The obvious solution is insulation, but how do you insulate a single skin garage wall? There is no cavity, so that is not an option.
Really you only have two options:
- Insulate from inside
- Add insulation to the outside
For internal insulation, there are two common options. The first is to install insulated plasterboards, and the second is to build some kind of internal stud wall, that can be used to house insulation.
To insulate a single skin garage from the outside, you can add external insulation panels. These are fixed to the outside wall and then rendered over.
Insulating a single skin garage with insulated plasterboard
Your first option is using an insulated plasterboard. These are essentially a standard plasterboard, with a rigid foam insulation attached to the back of the boards.
Insulated plasterboards usually range in thickness, from around 25 – 80mm (excluding plasterboard). This will vary slightly from different manufacturers. The thickness you choose will depend on how the garage will be used. Obviously, a thicker insulation will hold heat in for longer.
When fitting insulated plasterboard you have two options:
- Dot and Dab
- Fix timber battens and screw the boards.
Dot and dab can be a good option if the wall is not suffering from any damp. This is done by applying drywall adhesive dabs to the wall and fitting the board in place. You wall also need to use additional fixings (special plugs and screws) for additional support.
The additional fixings are mainly used in case of a fire. In the event of a fire, the insulation will burn fastest. This would cause the boards to fall away from the dabs. Adding additional screws will stop this from happening.
Your second option is attaching timber battens to the wall and screwing the boards directly to the timber. The battens can be fixed with plugs and screws to ensure a solid fixing. You can also add a DPM behind the batten. This will avoid any moisture passing from the wall into the timber.
Following this, you can screw the insulated plasterboards onto the timber battens. Personally this is my preferred method of the two options.
Adding an insulated stud wall
Another option for insulating a single skin garage, is building an internal stud wall. This can be a good option for a couple of reasons. Firstly, it will provide the insulation you require. Also, on top of that, it will create a cavity between the brick wall and the studwork.
If you already have an air-brick in your garage wall, you can also add a vent to the stud wall. This will give the garage better air circulation and reduce condensation.
The next benefit is it will be far more difficult for damp to pass from the external wall to the stud wall. You can improve this even further by adding a DPM under your stud wall and installing foil backed plasterboards to create a vapour barrier.
The only disadvantage of this method is it will take up more space. With that said, insulated plasterboards will also eat into the space quite a bit, so there isn’t much of a difference.
Below you can see a picture of a wall I personally used this method on. I built the stud wall with 50 x 47mm timber. This is a little smaller than standard stud work timber. However, it was a small space and I really wanted to save as much room as possible. I had a 25mm gap from the wall, and I used 12.5mm plasterboard.
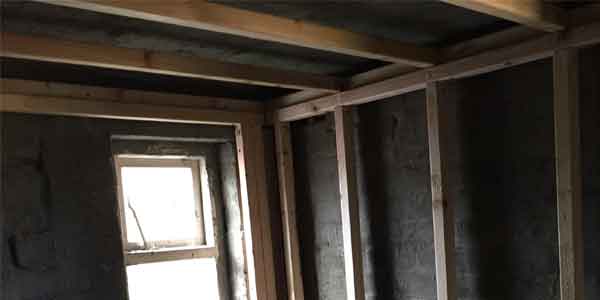
As a result, this added around 80mm to each wall. If you used a standard 3×2 stud wall, you could add an extra 20-25mm to this.
Insulating a single skin garage from outside
Your final option is adding insulation outside. This is quite a specialist job, so you would usually need to hire a professional team to do the work.
This technique uses insulated panels which are fixed to the walls. To do this, the entire wall needs priming, then the insulation is stuck to the existing wall with an adhesive. Following this, mechanical fixings are added to completely secure the insulation.
Next all the corners and edges have beading attached, and an adhesive and fiberglass mesh is added to the entire surface.
Finally the finishing render is added over the top.
As you can see, this is not a DIY project. If you do want external insulation installing, then a professional team is required.
Another thing to consider, is whether your garage is attached to your house. If it is, you would probably need to insulate the entire building. It would look rather odd if you only insulated and rendered your garage.
Conclusion
So these are your main options. In my personal opinion, the best way to insulate a single skin garage, is either:
- Insulated plasterboard fixed to battens.
- Or an internal stud wall with insulation
I feel that both of these are doable for the average DIY’er. Also, when using insulated plasterboards, I think battens are better than dot and dab. Not only is it easier to install, but you can also add extra protection from damp with a DPM behind the timber.
A stud wall gives several advantages, such as creating a cavity, insulation is easy to install between studs, and you can use foil backed plasterboards to create a vapour barrier.
The external option is certainly not a DIY project, and it will be significantly more expensive.