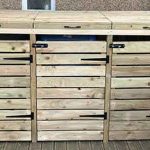
In the video below watch as I build a DIY log store. This is a simple project that can be build for around £150, and is ideal for anyone with basic DIY skills. The log store itself houses roughly a tonne of wood
In this article, we will be looking at how you can build your own DIY log store. This includes plans and instructions, as well as a detailed video of the entire process.
Building a homemade log store is a relatively small project and can be built in a single day, at a fraction of the cost of buying one pre-built.
As energy prices rise, and the cost of heating our homes gets more expensive, many people are turning to alternative methods of heating. One of the most common is burning their own wood. This is generally done via a wood burner or a multi fuel burner.
Wood is a common and cost-effective fuel source. However, you will need a decent amount of it to keep your fire lit throughout the colder months.
The wood also needs to be stacked appropriately. This allows air to circulate through and keep the wood dry. Storage will usually require some kind of log store. And due to the amount of wood you will burn, this wants to be a reasonably decent size.
If you decide to buy a log store, prices will commonly range between £300-£800. This would be the price range for a log store, capable of holding approximately 1 tonne of wood.
Its also worth noting, that log stores at the lower end of this price range, are likely to be lower quality and less robust.
If you do have some basic DIY skills, you could save a significant amount of money by building a log store yourself. The DIY log store in this article can be built for around £150 and took just 5 hours to finish. Even at an extremely steady pace, this is a job that can easily be done over the weekend.
How to build your DIY log store
Whenever I do any DIY project, I try to make them as simple as possible. So for this log store, I have tried to do the same.
The log store consists of four simple frames that are fixed together, some timber cladding screwed to the frames, and finally a sheet of plywood for the roof, with felt glued and stapled in place.
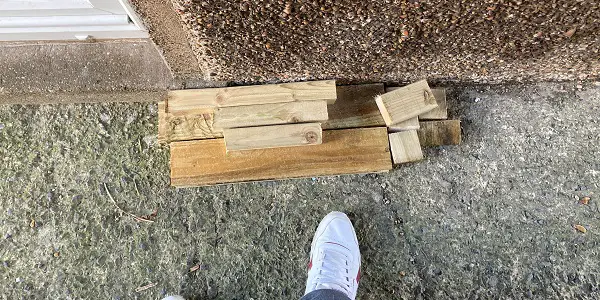
I have also ensured that the size matched the timber. Therefore there is practically zero waste from this project.
In the image below, you can see how much timber was left over once the job was complete.
Building the frames
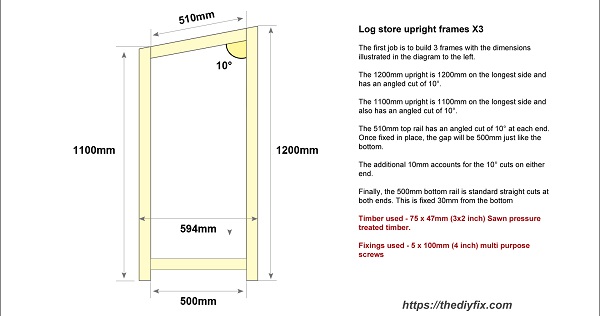
The main structure of the log store was made by building and connecting four very simple frames. Three of these were identical and formed the sides and middle upright frames of the log store. These three frames have an angled top to form the sloping roof. To achieve this, all the cuts at the top are cut at a 10° angle.
This process is explained in more detail in the video above. Also, a drawing of these frames can be seen in the image below:
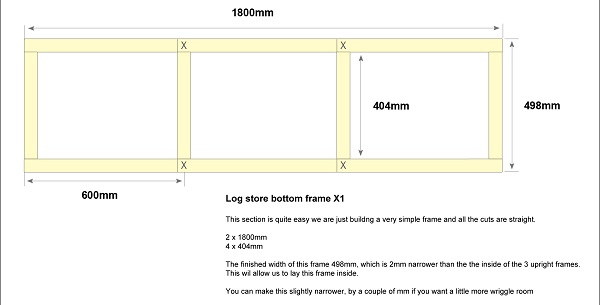
The fourth frame was the bottom of the log store and was a simple ladder frame that can be seen in the image below:
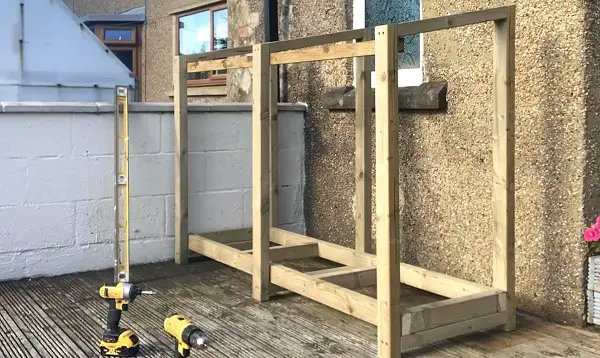
Once the frames where all built, they were connected together, and the top was fixed in place using a 50x25mm treated batten.
The entire frame was made from 75 x 47mm sawn treated timber, and it’s fixed together using 100mm multipurpose screws. Its finished dimensions are:
- 1800mm wide
- 1200mm high at the back
- 1100mm high at the front
- 594mm deep
Below you can see an image of the entire frame fixed together.
Cladding the frame
The process of cladding the frame is also very simple. The width at the back of the frame is 1800mm. Therefore, you get exactly two pieces out of a 3600mm length of timber.
Between each timber we leave 20mm gap. The timber used for the cladding is 100 x 20mm sawn treated timber. This means we need exactly ten lengths for the back. We can also use the 20mm thickness to form the gaps.
For the sides and the bottom shelf of the log store, the cladding is around 600mm. Therefore, we also get 5-6 cuts with very little waste from a 3600mm length.
All the cladding is fixed in place with 50mm decking screws.
Creating the log store roof
The final job is adding the roof which is very simple. Allow a slight overhang either side and cut to length. This can be fixed in place with your 50mm decking screws.
Once it is fixed in place, the entire top needs covering with felt. Firstly you will need to cut the felt. There should be at least 100mm overhang on all sides of the plywood.
Once the felt is cut to size, you will need to cover the plywood with felt adhesive. This is pretty thick stuff, so you want a decent sized brush to spread it about.
Once the ply is covered with adhesive, lay your felt on top and proceed to staple in place.
Fold any overhanging felt under the plywood and also staple this in place underneath.
And that’s it!
Once your roof is felted, your DIY log store is finished and ready to be filled with firewood.
Materials for this DIY log store and approximate cost
Below you can see the list of materials I used and the cost I personally paid. Obviously, prices will vary depending on where you buy. However, these are the prices I paid, and this should give you a rough idea of the cost.
Timber
- 5 lengths of 75 x 47mm sawn treated timber @ 3600mm long – £29.95 (5.99 each)
This is the timber used to build the entire frame of the log store.
I used a sawn eased edge timber; this has a slightly smoother finish than standard sawn timber, and the corners have a smoother beveled edge.
The timber was also graded C16, this is a strength grade and means the timber is generally better quality. For example, it will be straighter, with less knots and defects, etc.
If you want to save a small amount of money, you could opt for an ungraded sawn timber. However, I wanted the frame to be high quality and strong. - 12 lengths of 100 x 20mm sawn treated timber @ 3600mm long – £43.44 (3.62 each)
This was the timber used for the cladding around the log store. It was a standard sawn pressure treated timber, so a little rougher around the edges. However, I think it looks nice. I actually used this exact same wood for cladding a bin store I built. You can see my DIY wheelie bin store here. - 1 ungraded treated batten 50 x 25mm @ 3600mm – £2.68
This was simply used to fix the top of the bin store frame together and achieve the same width as the bottom of the store. This is quite simple, and you can see how it is used in the video. - 0.5 sheets of Classic hardwood faced plywood 2440 x 610 x 18mm – £21.00
This was the plywood used to construct the roof. I opted for a thicker, high-quality board. In my opinion this was the best choice for outdoor use. You could opt for slightly cheaper plywood or even a sheet of OSB.
The timber merchant was able to cut the board in half form me, so I only paid for half a sheet.
To ensure you get the best prices, I would always recommend shopping around. Generally, you will get the best deals at a local builder’s merchants, or a timber merchant, as opposed to a big DIY store like Wickes, or B&Q.
Also big DIY chains are less likely to cut your plywood to size for you. Therefore you will end up paying for a full sheet, more than half of which you don’t need.
Other materials and fixings
- 1 roll of roof felt – £23.99 from Screwfix
- 1 tin of roof felt adhesive (I used Blackjack) – £9.49 from Toolstation
- Heavy duty 10mm staples – £3.49 from Toolstation
- Box of 50mm green decking screws (200) – £7.99 from Toolstation
- Box of 100mm multipurpose screws (100) – £7.49 from timber merchant
The main reason I bought these here, was it pushed me over £100 total when ordering the wood, so it meant I avoided a £10 delivery charge. The entire timber order would have been £2.51 more expensive without these screws added.
During my research for materials, Screwfix and Toolstation were the best prices on the fixings, adhesive and felt.
They are also on the same industrial estate near me, so it wasn’t any hassle to pop into both.
Total cost of timber and materials – £149.52
Tools required:
- Chop saw – You can use a handsaw if you don’t have a chop saw
- Cordless drill
- Tape measure
- Pencil
- Square
- Bevel
- Staple gun
- Paint brush
Conclusion
This is a simple DIY log store project and I think the end result is really nice, not to mention extremely robust and high quality.
The materials are relatively cheap, and the tools required to complete the job are pretty basic. Even if you don’t have a chop saw, you can still struggle along with a hand saw.
Also, if you consider the price of buying a high-quality log store, you could probably buy a half decent chop saw, a cordless drill, plus all the materials for this project and still have change.
I hope you enjoyed this guide and good luck building your own log store.