Let’s face it, wheelie bins are not the most attractive item outside our homes. For this reason, DIY wheelie bin storage can be a popular project for the do it yourself enthusiast.
Building a bin store is relatively straight forward and doesn’t really require any unique skills. Essentially, if you can follow simple instructions, cut wood to length, and fix it together with screws, this is a project that most people could take on.
Obviously, you do have the option to buy a pre-made bin store. However, these can be quite expensive, and a basic triple bin store won’t give you much change from £400.
Also, the quality is usually lower than a good sturdy DIY bin store. Even if you use better quality timber, you should be able to save at least 50% on the cost by building it yourself.
DIY Bin Store build process Part 1 (frames)
As you can see in the video above, the actual build of this bin store was extremely simple. The majority of the frames consisted of two uprights, a top and a bottom. The only frame that was different was the back frame which had two more uprights, these added extra stability and also gave us the correct measurement to fix our dividing frames, which formed the individual bin store areas.
The lids and the doors were also built in the exact same manner. Basically, every frame excluding the large back frame, was made of 4 pieces of timber.
You can see the list of frames and their dimensions below:
- 1 x back frame – 2130mm x 1160mm (this was the only frame made of more than 4 pieces of timber)
- 4 dividing frames – 800mm x 1160mm
- 2 door frames – 1020mm x 615mm
- 1 door frame – 1020mm x 665mm
- 3 lid frames – 900mm x 720mm
As you can see there is one door frame that was slightly wider than the other two. This was due to our blue recycling bin being slightly wider than our green (standard bin) and brown (garden waste bin).
You should check your own bin dimensions to make sure they are the same before you use the exact lengths above. Whatever size your bin is, I would recommend around 50mm of clearance. This will make it nice and easy to remove and replace your bins.
DIY wheelie bin storage process part 2 (fixing and cladding frames)
When constructing your wheelie bin store, you should first build the back and dividing frames. This will mean you have 5 frames in total (1 back frame and 4 dividing frames). Once the timbers are cut and screwed together to form the frames, you can begin connecting them to each other.
At this point you will need to screw through the back frame into the smaller dividing frames. This should be done ensuring that your dividing frames are in the right position and flush with either end of your back frame.
Add a screw at the top middle and bottom of each frame to give you a strong and solid fixing.
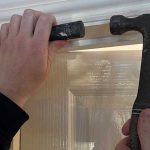
Once these 5 frames are fixed together you will have the basic frame built. Following this you can begin to clad the back and sides of the frame with boards (I used 22mm x 100mm fencing boards). You may also need to brace the back of your frame to ensure it is nice and square (see video above for more details).
Creating and fitting doors and lids for your bin store
Just like every other part of this DIY build, the doors and lids are very simple. Each frame consists of 4 pieces of timber, which form a simple rectangular frame. Once each frame is built, cut all your fence boards to the correct lengths, and add them to the frame. This cladding will solidify the frame and ensure that everything is nice and square.
Once your doors and lids are complete, you can fix them to the frame. For the doors I recommend using t-hinges (the type you often see on gates) and for the lids you can use a standard hinge that fixes to the back of the lid and frame. Use zinc plated for some extra weather protection, or stainless steel if your feeling flush and want to completely avoid any future rust.
Once your doors and lids are attached you can then add ironmongery such as bolts latches and handles.
At this point, your wheelie bin store is complete. If you want, you can add additional stability by fixing your frame to the floor below and even to any walls behind or to the sides. This is not essential, but it will provide more stability, and this will reduce any movement in your bin store.
Tools & materials to create DIY wheelie bin storage
This is a project that can be completed with basic tools and materials. Below is a list of tools that are required, as well as some that will make the job easier.
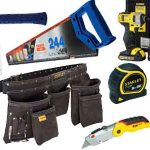
- Hammer
- Cordless drill / driver
- Sharp hand saw
- Tape measure
- Pencil
- Spirit level
- Chop saw (not essential but will save a huge amount of time)
- Large square (not essential but could help to check frames for square)
As you can see, the list of tools is pretty small, and anyone that has any interest in DIY should already have most of these. If not, the majority can be picked up at a fairly low cost and should come in handy for other projects in the future.
Materials
Please Note: These are the materials I used for my project. Some dimensions may vary based on where you buy from. Also, it is worth double checking your own measurements before purchasing large amounts of materials.
Another thing to consider is quality and price. Generally, you will get better prices from timber merchants and builder’s merchants than somewhere like Wickes or B&Q.
Finally, to ensure the best quality, where possible, go select your own timber. Nothing sucks more than a delivery of warped and bowing timber. If you do this yourself, you can ensure you get the highest quality for the same price.
- 22 lengths of 2X2 – Length 2.4m, width 45mm, thickness 45mm
- 23 lengths fencing board – Length 3.6m, width 100mm, thickness 22mm
- 1 length of 2 x 1 – Length 2.4m, width 47 mm, thickness 22mm
- Decking screws – 200 x 50mm & 200 x 75mm
- 3 sets of hinges for your lids (either zinc plated or stainless steel)
- 3 sets of tee hinges
- Handles for the bin lids
- Bolts, latches, or hooks for the doors (your personal choice).
Advantage of DIY Wheelie bin storage
There are two main advantages to building your own wheelie bin store. The first is you will save money. A good quality off the shelf bin store, will cost you at least double the cost of timber (shop around for best prices).
The other main advantage is quality. This includes the quality of materials and the quality of the build itself. One thing you will often find with premade units is they are using smaller and thinner cuts of timber. This is obviously done, so the companies can generate a decent profit margin, and that’s fair enough. However, when you buy better quality, thicker cuts of timber, you can build a much more robust frame.
I have friends and family members who have spent £400+ on triple wheelie bin stores and the quality is OK, but the overall product is nowhere near as sturdy as this DIY option that I created in just 1 day.