Have you ever looked into your garden, and imagined what it would be like to have your very own garden room? Maybe you want a home office, a gym, a bar, or just somewhere to relax away from the main house.
That is exactly what I wanted for the last few years. In my case, I really wanted a home gym. I knew this would be hard work and take some time. However, I was confident I could do the job myself as a DIY project. So, I decided to bite the bullet and give it a go, and over the next seven weeks, I turned my dream into reality.
Today, I’ll walk you through how I achieved this, and how you can also build your very own DIY garden room.
In the article below, I will go through the steps I took to build this room almost entirely on my own. This will give an overview of the process. Also, in each section, I will link to a more detailed video tutorial for each step of the build.
You can also see the entire build and the overall cost in a time lapse video below:
Creating the foundations: Concrete base
One of the most crucial steps to create your garden room, is building a sturdy foundation. While there are various methods, such as ground screws, rods, and concrete pads, I opted for a concrete base. This was a method I believed I could do, and it was also cost effective.
My goal with this entire project was to do it on a budget. Therefore, I tried to do each part of the build at a low cost whilst still producing a high-quality product.
Creating a concrete base was a new project for me. I had never done this before, but I did have a reasonable understanding of the process. To brush up on my knowledge, I ended up watching several YouTube videos to better learn the process.
Once I was confident I knew what I was doing, I got to work, and the result was a very good quality 4-inch concrete base.
You can see the basic steps below and a link to a more detailed video tutorial:
- The first job was to create the formwork (shuttering) for pouring the concrete.
- I mixed my own concrete 5 parts sand and 1 part cement using a cement mixer
- After preparing the mix, I poured the concrete into the timber formwork, ensuring it was spread evenly.
You can see a more detailed video of the entire process by clicking here
Building the floor
Next up, I built the floor. This was a timber floor that sat directly on top of the base, separated by a 1200-gauge DPM. The floor was also fully insulated with 50mm PIR insulation.
You can see the steps below and a link to a more detailed video tutorial:
- The first step was to build the frame/floor joists. This was done with 75x50mm treated timber.
For a suspended floor, built on something like ground screws, I would recommend thicker timber (for example 100-150mm). However, this floor was already sitting on a 100mm concrete slab, so I felt 75mm was sufficient. - Add a Damp Proof Membrane (DPM) this was used to protect against moisture transfer between the base and the floor.
- Next I filled the floor with insulation to ensure warmth is retained inside the garden room.
- Finally, I finished by adding tongue and groove chipboard flooring.
You can see a more detailed video of the entire process by clicking here
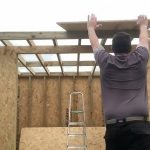
Erecting the garden room walls
This may seem quite daunting, but in reality you are simply building stud walls, so the process is actually quite simple. It is also an extremely rewarding part of the job, as you start to see your DIY garden room taking shape:
- Building each wall is almost identical to the floor construction. The only difference is I used 100mm x 50mm timber. Once each wall is built, stand it up in position and fix into the floor.
- As you build each subsequent wall, you will need to fix them to each other.
- Once the frames are up you can then cover in structural OSB to strengthen the structure.
You can see a more detailed video of the entire process by clicking here
Adding your garden room roof
Once the walls are up, you can start adding your roof timbers. This process will complete the shell of your build, and it will really start to take shape. Once your roof is on, you will get a feel for how the finished project will look
- Cut and add your roof joists
- Add more OSB sheets to create the roof surface
- Add the fascia and soffit.
- Finish with the EPDM rubber roof
We have 3 separate videos that go into detail on each of these steps.
- For fitting the roof joists click here
- For facia and soffit click here
- And for the EDPM rubber roof tutorial click here
Bringing Light Inside by adding Windows and Doors
You’ll want to make this space airy and bright. You will also need to add access to your DIY garden room. To do this:
- You will need to Install doors to your build.
- Fit any windows that you require.
To see exactly how I installed my windows click here
Insulate the walls and roof
To make your garden room comfy throughout the year, it is advised to add insulation in all surfaces. This means, as well as the floor insulation, you will require wall and roof insulation:
- Cut and add your PIR insulation between roof joists and wall studs.
- Fill any gaps with expanding foam.
To see how I added insulation click here
Finish with plasterboard and dry lining
For this part of the garden room build you have two choices. You could plasterboard and then hire a plasterer to finish off your walls and ceiling. However, I chose to dry line, which is a slightly easier process if you don’t know how to plaster:
- Apply a vapor barrier to protect against moisture.
- Add plasterboard. You can rent a board lift if you’re doing it solo.
- Use the dry lining technique for finishing off the joints between your boards.
To see the entire drylining process click here
Painting inside your garden room
Once your dry lining is complete, you can add some paint to brighten up the inside of your garden room. A mist coat, followed by a couple of coats of paint, should do the trick in most cases
Add your external cladding
For the exterior cladding, I chose British Western Red Cedar. The cladding you choose will depend on your desired finish. Whatever cladding you choose, the process will be similar and is pretty simple.
To watch how I installed the cladding click here
Adding internal flooring
Back inside, lay down your preferred flooring. I opted for a rubber gym flooring, as this was the intended use for my DIY garden room project.
To see how I added this type of flooring click here
Also to see how I added the skirting boards after my flooring click here
Protect the exterior cladding
Finally, sand and apply a UV protection oil to maintain the timber’s appearance and longevity.
This is a simple process and just requires the correct oil to treat your cladding and a good brush
To watch how I added Osmo UV protect oil click here
Conclusion
And there you have it! With determination and a bit of DIY knowledge, you can have a stunning garden room that doesn’t break the bank. My own build cost around a third of hiring a professional and the quality is just as good in my opinion.
Remember, while this guide gives an overview, you can always delve deeper into the specific steps by watching through the more detailed tutorials listed on this page.
Happy building!