Everyone wants a comfortable home. One factor that contributes to this, is living in a nice warm property. However, heating a home can be expensive and most people would like to reduce energy costs, and make their home more efficient. If you don’t already have something like cavity insulation, an alternative solution is installing insulated plaster boards.
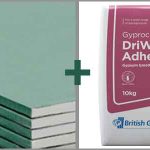
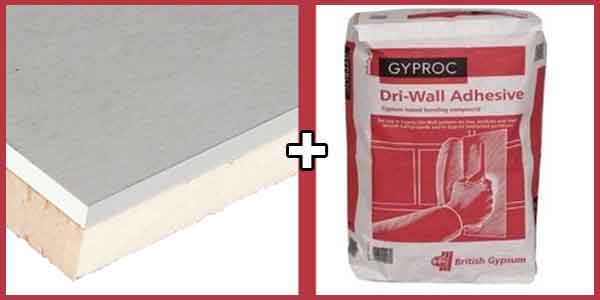
Unlike standard plasterboard, insulated boards have a thick layer of insulation stuck to the back of the board. Just like more standard forms of insulation, this helps to keep your home warm and energy-efficient.
The boards are fitted internally and there are several methods that can be used. A common question is whether you can use dot and dab to fit insulation boards. Or will you need to find an alternative solution?
It is possible to dot and dab insulated plasterboard, but there are several things you will need to consider before you fit them. The aim is to make sure you have a secure grip on the wall. This will mean that the surface should be free of cracks, dirt and any other lose material.
Providing the wall is in good condition, dot and dab can be a quick and efficient way to fit your boards. However, you will need to use additional fixings to help secure the boards to the wall. This is a requirement to meet fire regulations. It will help to ensure that your boards stay on the wall and continue to do their job year after year.
How Do You Dot and Dab Insulated Plasterboard?
Dot and dab is one of the easiest and fastest ways to install plasterboard. However, when you are fixing insulated boards, the process is slightly different. This is to make sure the boards are fitted securely; Therefore, you will need to follow the correct process.
Before you begin to fit your boards, there is a small amount of prep work that you will need to carry out. The first is to ensure that the wall is in pristine condition. If you are fixing them directly to clean brickwork or a solid wall, then there is less to worry about.
If the walls are painted or plastered, then you will need to make sure that both are in excellent condition. You should look for cracks, weak spots, blown spots and any areas that could pull away from the wall. If you fit the boards to a weak surface, they could eventually pull away from the wall because of the weight.
Even if the surface is in perfect condition, you will need to use mechanical fixings when installing insulated boards. This is to ensure that the boards meet fire regulations. The reason for the mechanical fixings, is to ensure the boards remain secure. During a fire, the insulated backing can melt, and this could cause the board to detach from the wall. But with the mechanical fixings, the boards will remain in place.
For the mechanical fixings, you will need to drill holes and screw the boards to the wall. When putting the fixings into place, you should also make sure the screw head sits just below the surface of the plasterboard, this way it can be easily filled and hidden.
You should fit your boards first with dot and dab. Once the adhesive is dry and the wall is securely in place you can add your mechanical fixings directly through the dabs. This will avoid the fixings pulling right through the board.
When originally fitting your boards to the wall, you should apply a band of adhesive around the perimeter of each wall. The same should also be done around openings and services. This will provide support for edges and will also act as a fire stop.
Now you can add more dot and dab in three vertical rows (per board), ideally you should try to cover a minimum of 20% of the plasterboard area. Each dab should be between 50 and 75mm wide and 250mm long, allowing you to fit your boards to the wall.
Is It Worth Using Insulated Plasterboard?
We are living in a time where most people are trying to be more environmentally friendly. Not only that, but energy prices are rising and households around the UK want to reduce energy waste. One problem is that many homes don’t have sufficient insulation, which is particularly true for older properties.
While most modern homes will have cavity insulation, this is certainly not true on properties built before the 1920s. This can mean homes are losing heat and letting cold in. As a result, energy bills will rise, and this can have an impact on the environment too.
Installing insulated plasterboard on the internal walls can be a really good solution to this. It is relatively quick and simple to install, and it can help to reduce heat loss and prevent cold air from entering the property. While you will lose around 50mm of space on each wall, it is often worth losing the space to experience the benefits that the extra insulation can offer.
During the winter, they will help to retain heat and during the summer, they will help to reduce outside heat from entering. This will ensure your home maintains a reasonably balanced temperature all year round.
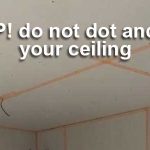
Can I Use Insulated Plasterboard on a Ceiling?
Yes, it is possible to fit insulated plasterboard to a ceiling. However, you will need to make sure that you secure them correctly.
The main thing to note is that you cannot dot and dab any plasterboard to a ceiling. This is because the boards are too heavy, and the adhesive will not create a strong enough bond. This is particularly dangerous as it could pose a risk to people below and it would also be a major fire risk.
To make sure that you fit them securely, you will need to find the joists. The easiest way to do this is using a bradawl. This will involve piercing the existing ceiling to find the joists. Once the joists have been found, you can mark their location on the wall, so you know exactly where your fixings need to go.
The boards can then be secured in place using fireproof mechanical fixings. There are specific screws available that offer this. Furthermore, they are designed to minimise thermal bridging which can help to reduce cold spots.
Conclusion
As you can see, it is possible to dot and dab insulated plasterboard, but they are fitted slightly differently to standard boards. You will need to use dot and dab, as well as mechanical fixings to meet fire regulations.
Of course, you will also need to carry out all prep work beforehand too. This will make sure the surface you are fixing to is secure and solid enough to create a good bond between the board, the adhesive, and the wall.