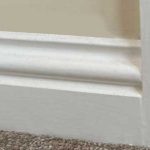
Architrave is a decorative feature applied around door casings. This job is done during the second fix phase of joinery. Its main purpose is to cover the gap between the plastered walls and the door casing. This provides an aesthetically pleasing finish to internal doors.
If you are using a hammer and nails. The best nails for fitting architraves are 40mm oval nails. This type of nail has a small, rounded head, that produces a discreet hole, which is easy to punch below the surface and fill.

If you are using a second fix nail gun, you can use 38mm brads. These will produce an even smaller hole. Also, most nail guns will allow you to set nail depth. This means you don’t need to punch the nails after fitting your architrave.
To see our favourite second fix nail guns click here. We discuss our 3 favourites, these range from professional, to a more affordable DIY version. Each one is a great choice for fitting architrave and skirting boards.
Obviously, a nail gun is not essential. A decent hammer, a bag of 40mm oval nails, and a nail punch will definitely do the trick. However, if you are fitting a lot of architraves, then a second fix nailer can be a huge time saver.
What are the best adhesives for fixing architrave?
When fitting your architrave, you will also need to use an adhesive on the back of the boards, as well as nailing. This can be any kind of grip adhesive, like No More Nails or even a cheaper brand.
You really don’t need to go overboard here, a cheap grab adhesive, for a few pounds will be more than adequate. There is no need to spend a fortune on this adhesive.
Architraves are pretty light weight, and gravity won’t be pulling them off the wall any time soon. In fact, they would stay on without an adhesive. However, you should still use one.
The adhesive will give you extra grip and hold the board tight back to the wall. This will help to avoid any gaps forming between the architrave and the wall. As well as any other movement in the timber.
This includes things like twisting and warping. As well as expansion and contraction, due to small changes in moisture content. Movement is quite common in different seasons, as temperature and humidity changes in your property.
An adhesive will reduce this movement to a minimum and keep your architraves looking nice and neat.
Don’t forget to glue your mitres!
As well as nailing your architrave, and a grab adhesive, you should also glue the mitre joints. This is where the legs of your architrave meet the head.
The last thing you want when you have perfectly cut mitres, is a gap forming because you forgot to glue them. It will completely ruin the aesthetics of your architrave, so applying a small amount of glue is a quick and effective solution.
You have two main choices here. The first is to use a standard wood glue. This is very similar to a normal PVA. It will do a good enough job in the vast majority of cases.
You can also create a stronger seal, by using a stronger adhesive, such as mitre mate. Miter mate is a two-part bond adhesive. The two parts consist of a glue and an activator spray.
To use this method, you simply add a small amount of the glue to one side of the joint, and then spray the other side. Once you bring each surface together, the activator causes the glue to go off. This only takes 10-15 seconds and it sets solid.
This type of adhesive can be helpful, especially if there is more chance of the gap opening up. For example, if your architrave is fitted on a slightly uneven surface, that naturally pulls the mitre open.
In most cases, a normal wood glue will be perfectly fine. With that said, some mitre mate is always a handy adhesive to have in your tool kit. It can be used for any little job where you need to glue something quickly and securely.
Conclusion
To fix architrave in place, you will need to nail it. Screwing architraves is not an option, as it wouldn’t give the discreet finish a small nail head does. Due to this, the type of nail is also important. You need a nail that has a small head, that is easy to punch below the surface and fill.
The best nails when fitting architrave manually, are 40mm oval nails, or lost head nails. If you use a nail gun, 38mm brads will do the job just as good, if not slightly better.
The nail gun is obviously faster, and it does create smaller holes. These are also pre-sunk, so there is no need to use a nail punch.
As well as the nails, remember to use a grab adhesive on the back of your boards, and a wood glue to secure your mitres.
Using all these correctly, will give you a perfectly fixed set of architraves.