Gravel Infill, Compaction & Finishing
Once the grids are installed, flat, and fully locked, the final step is filling them with gravel and compacting the surface. This stage determines how the surface feels underfoot and how it performs long term.
Step 1: Choose the correct gravel (size and shape)
Two things matter here: size and shape.
Gravel size
- 6–20 mm works well
I used:
- 20 mm on my driveway
- 10 mm on my sauna base
If I were doing it again, I’d probably use 10 mm everywhere. The difference is minimal from a structural standpoint, but 10mm did seem to lock into the grids slightly better and aesthetically I just think 10mm looks better.
Avoid very large stone. It can bridge inside the grid cells and won’t compact properly. Many grid manufacturer says up to 30mm, but I would avoid going over 20mm.
Gravel shape (this is critical)
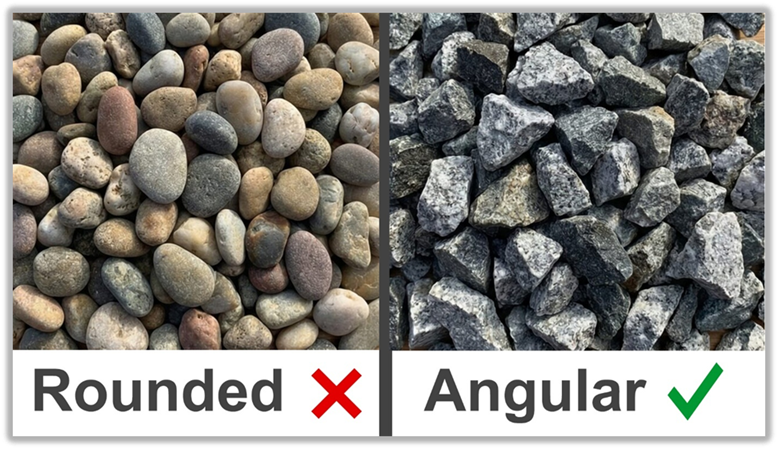
The gravel must be angular, not rounded.
What you want:
- crushed stone
- angular gravel
- limestone
- granite chippings
Angular stone:
- locks together inside the grid cells
- compacts properly
- resists movement under load
What to avoid:
- rounded gravel
- pea shingle
- river gravel
- decorative smooth stone
Rounded gravel rolls instead of locking and defeats the point of using grids. This is one of the biggest mistakes people make.
A simple test:
If the stones feel smooth and rounded in your hand, don’t use them.
Step 2: Fill the grids
- Spread the gravel evenly across the surface
- Work it into the grid cells with a rake or shovel
- Make sure all cells are fully filled
At this stage, the gravel will usually sit flush with the top of the grids, and the grid structure may still be visible.
That’s normal.
Step 3: Initial compaction
Once the grids are filled:
- give the surface a light pass with a wacker plate
- work in multiple directions
The aim is to:
- settle the gravel into the grid cells
- remove voids
- lock the stone together
You don’t need aggressive compaction. Let the angular gravel and grids do the work.
Step 4: Decide how you want to finish the surface
At this point you have two valid finishing options, both of which work.
Option 1: Finish flush with the grids
This is how I finished my driveway.
- Fill and compact the gravel so it sits roughly level with the top of the grids
- The grid pattern may remain visible
This finish:
- is very stable
- drains well
- performs exactly as intended
Seeing the grids is not a problem structurally. This is a perfectly acceptable finished surface.
Option 2: Overfill for appearance (my sauna base)
For my sauna base, I added an extra 10–20 mm of gravel on top after filling the grids.
- Add a thin layer of gravel over the filled grids
- Lightly compact again
Despite looking looser, this finish is:
- surprisingly solid underfoot
- comfortable to walk on
- does not move around when walked on
This gives a more traditional gravel appearance while still benefiting from the grid system underneath.
Step 5: Final compaction and tidy-up
Whichever finish you choose:
- give the surface a final light compaction
- top up any low spots if needed
- check edges and transitions
This is also a good time to:
- sweep excess gravel
- tidy edges
- make small adjustments while everything is fresh
What to expect after installation
- Minor settlement in the first few weeks is normal
- A small top-up may be needed
- After that, the surface should remain stable
Gravel grids dramatically reduce long-term movement compared to loose gravel, provided angular stone is used.
Common mistakes to avoid
- Using rounded or decorative gravel
- Expecting the grids to disappear without overfilling
- Skipping compaction
- Forgetting to top up after the first pass
- Overthinking the finish
Both visible grids and lightly overfilled finishes are valid.
The takeaway
If you:
- use angular gravel
- fill the grids properly
- compact lightly but thoroughly
You’ll end up with a stable, permeable surface whether the grids remain visible or not.
Both finishes work. Choose the one you prefer.
That’s the build complete.
My personal Grid Recommendation
If you are looking for gravel grids to use in your own project I highly recommend EcoGrid. This company offers a very high-quality product, and their grids are guaranteed for 20 years. They also stock very good quality geotextile membranes. You can get a 5% discount on all EcoGrid products by Clicking Here